Before you start… please make sure this article is relevant to you. The process mentioned here only works if you running Linux and
use Pulse Audio as your audio server. You can check if you use Pulse Audio by running pulseaudio --check; echo $?.
If the last output is 0, then you have pulseaudio installed and running.
This articles explains how you can record in-game audio while filtering out anything else using Open Broadcaster Software (OBS). In the example I will actually be isolating in-game audio, comms and the rest from each other. If you just want to isolate the game, this will also work.
If you do not care about why it works and just want something to quickly copy and paste, head to the TLDR Section.
Why does OBS record all audio?
In it’s default configuration OBS will record your default Audio Output — which should be your Speakers or Headphones. As a result, any other audio sources like some Youtube video running in the background, or someone talking on Discord, will also be recorded by OBS.
You can check your current audio settings by going to File > Settings> Audio > Global Audio Devices.
You will probably have something like Desktop Audio set to Default, Mic/Auxiliary Audio set to your Microphone, and the rest set to Disabled.
You will need to make a few changes here later on.
Concept behind isolating sound
You might be wondering now… how does knowing that you can pick which Audio Output Device OBS should use help in this situation? You still want to be able to hear the game and – for example – Discord or Youtube while only having the game’s audio be on the recording or stream.
This is where Pulseaudio comes into play. But before we proceed, I would first like to visualize the current situation:

Every Program is routed to your default output device — for example a pair of Headphones. As a result you can hear audio from all programs. The downside of this is that OBS can also “hear” all the programs.
What if the game would be routed to another output device instead? Let’s say your headphones are connected via USB, what if you route the game’s audio to your on-board audio controller instead and use it as OBS’s audio source?

Now OBS will only “hear” the game audio. Unfortunately, this way you cannot hear any in-game audio yourself as the game audio is not routed to your headphones.
What if you could have an output device which can listen to any audio it receives and pass it on to another output device?

This way OBS just gets to “hear” the game while you can still hear everything!
Sometimes it makes sense to also have the Comms on the recording. You could create another device that does the same thing and use it just for comms.

Soo… this device that can redirect its input — this is where Pulseaudio comes into play. It provides means to configure and extend the default setup. Using its Config File you can create two virtual output devices and link them up to your headphones.
Configuring Pulseaudio
Locating the config directory
First you need to decide if you want these virtual output devices to be a user-wide or a system-wide change.
If you want this to be a system-wide change, you will need to modify the /etc/pulse/default.pa file.
Note you will need superuser access to do so.
For user-wide changes the file is ~/.config/pulse/default.pa. Note that this file is not always present.
If it does not exist you can just create a new file with that path.
Pulseaudio will first look at the user-wide path and then fall back to the system-wide path.
For this article I will be using a user-wide config file (~/.config/pulse/default.pa).
Create the file if it does not exist yet. The file is run during startup of the Pulseaudio Server.
Config Preamble
#!/usr/bin/pulseaudio -nF
# include the default.pa pulseaudio config file
.include /etc/pulse/default.pa
These are the first 3 lines of my ~/.config/pulse/default.pa.
If you are using the system-wide config,
do not use the second and third line. This config basically does nothing but import the system-wide settings.
This is done because when defining a user-wide config it does not read the system-wide config at all –
unless you tell the script to do so via the .include-directive.
Create virtual output device
Add the following lines to the config file, below the preamble mentioned above.
# null sink
.ifexists module-null-sink.so
load-module module-null-sink sink_name=Virtual_Game sink_properties=device.description=VirtualGame
load-module module-null-sink sink_name=Virtual_Comms sink_properties=device.description=VirtualComms
.endif
This creates two virtual output devices. They are wrapped in a .ifexists-Block as to not
completely break your Audio in case — for some reason — the relevant module cannot be found.
An output device should always have a name (sink_name=NameHere) and a description (sink_properties=device.description=DescriptionHere).
The virtual devices MUST have a description. If they do not have a description, you will not be able to find them in your Audio Settings.
To see if this was successful, restart the pulseaudio daemon. How to do this depends on your Distribution.
For me on Manjaro KDE running systemctl --user restart pulseaudio works.
If you cannot find a way to reboot the daemon, you can always reboot the entire system.
If you open your Audio Control Panel you should now see the devices you created. Their name will be the description you gave them:
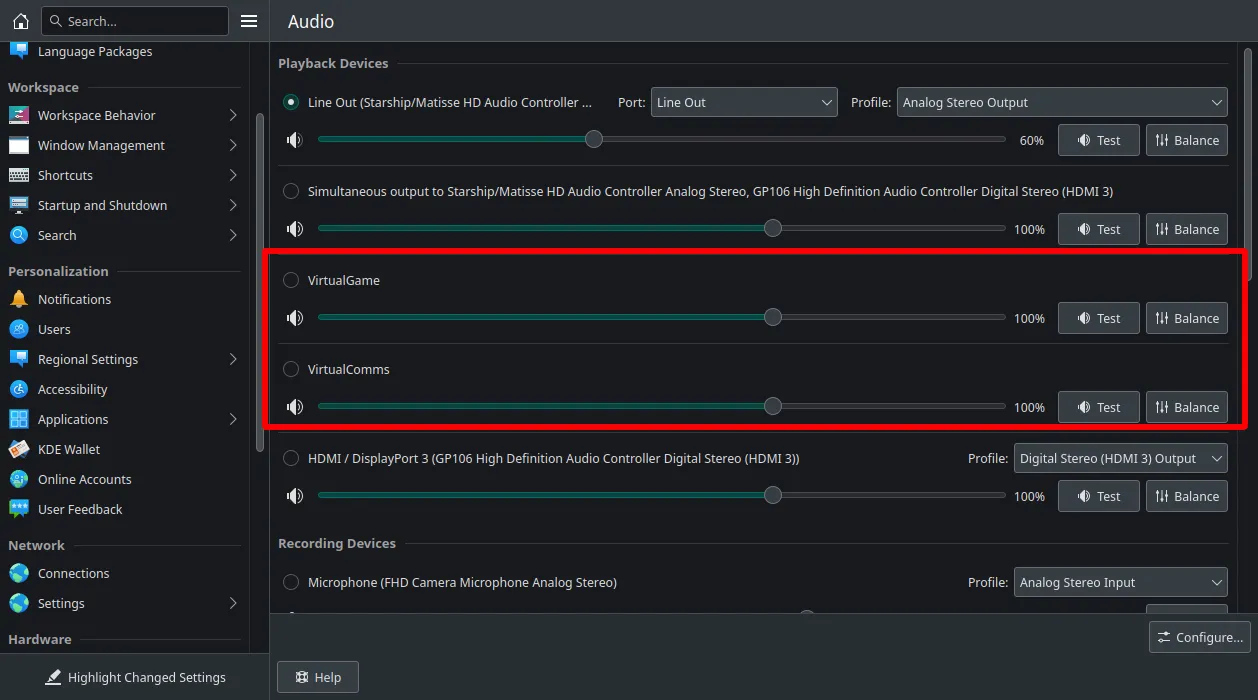
You now have your virtual devices. At this point you can already send audio towards the devices. They are however not redirecting the input towards your real output device yet. The next section will cover that.
Sink Loopback
Before you proceed you will need to find your real output device’s Name. Start any audio playback on your output and run
pactl list sinks | grep -E 'Name|Sink|State'.
pactl list sinks will list all “Sinks” — thats what Pulseaudio calls devices like Headphones or Speakers… basically what I call “output devices” here.
Each entry contains loads of information. You only care about the Name and Status though. That is why grep -E 'Name|Sink|State' is used.
You should get something like this back:
Sink #1
State: RUNNING
Name: alsa_output.pci-0000_28_00.4.analog-stereo
Sink #2
State: IDLE
Name: combined
Sink #9
State: RUNNING
Name: alsa_output.pci-0000_26_00.1.hdmi-stereo-extra2
In my instance I have two sinks that are running.
By looking at the name I can see that the Sink #1 (analog-stereo) are my headphones.
Sink #9 is my display. Here, I am copying the name of my headphones, alsa_output.pci-0000_28_00.4.analog-stereo,
somewhere where I can retrieve it later.
Go back to the config file and add the following contents for each virtual output device you have created:
load-module module-loopback latency_msec=1 source=SinkName.monitor sink=RealDeviceSubstitute SinkName with your virtual device name and RealDevice with the device name you copied earlier.
For my specific example this looks like this:
load-module module-loopback latency_msec=1 source=Virtual_Game.monitor sink=alsa_output.pci-0000_28_00.4.analog-stereo
load-module module-loopback latency_msec=1 source=Virtual_Comms.monitor sink=alsa_output.pci-0000_28_00.4.analog-stereo
And this should be the hard part done. You might notice some crackling from audio coming from your virtual devices.
You can increase latency_msec to reduce crackling. This will however introduce a more delay.
Wiring output devices
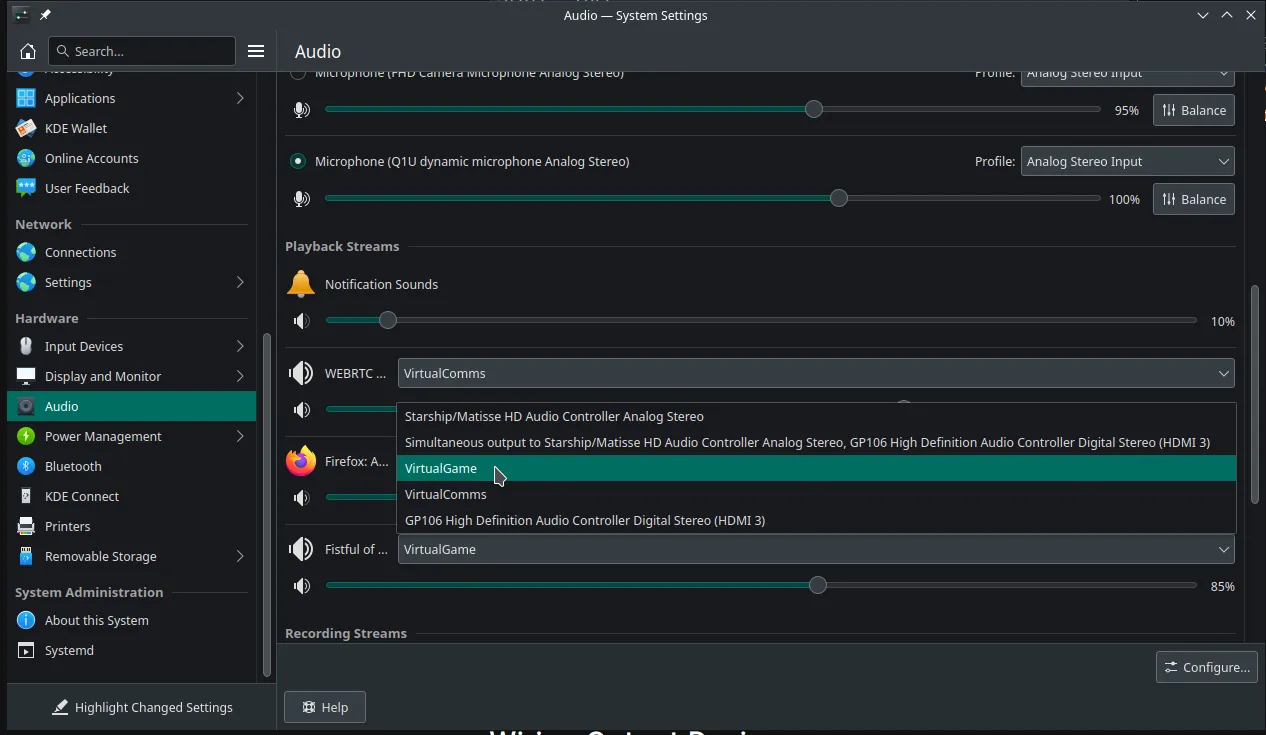
System
Next thing you need to do is to make use wire your games to that your Games Virtual Output. On Manjaro KDE you can do this by right-clicking the in the task bar and going to Configure Audio Devices. Scroll down to Playback Streams and find your game here. Select your game output from the dropdown.
OBS
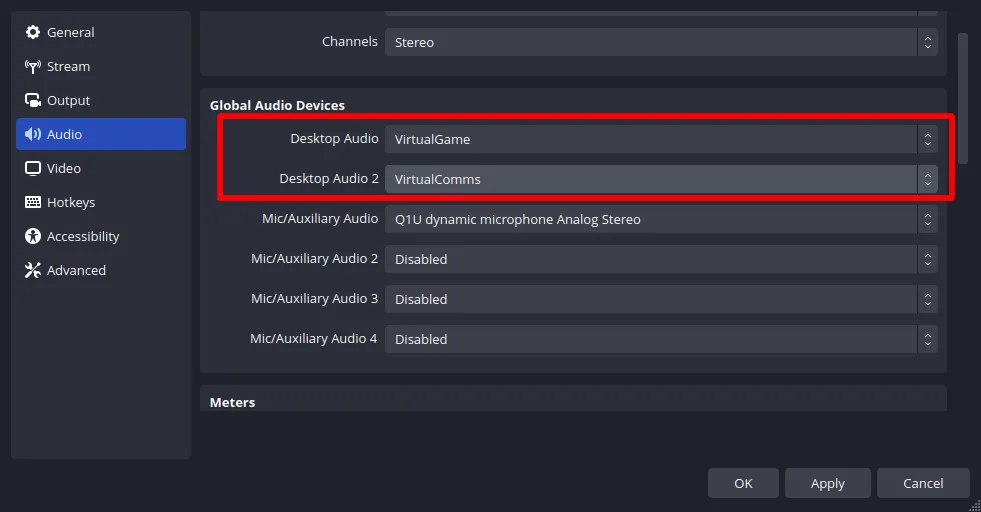
Go to the OBS Audio Settings and write your Virtual Game Output and your Virtual Comms Output to Desktop Audio and Desktop Audio 2
TLDR
Get your Device Name by running pactl list sinks | grep -E 'Name|Sink|State'
Open or create ~/.config/pulse/default.pa
Add the following contents. Replace YourDeviceName with your Device Name.
#!/usr/bin/pulseaudio -nF
# include the default.pa pulseaudio config file
.include /etc/pulse/default.pa

# null sink
.ifexists module-null-sink.so
load-module module-null-sink sink_name=Virtual_Game sink_properties=device.description=VirtualGame
load-module module-null-sink sink_name=Virtual_Comms sink_properties=device.description=VirtualComms
.endif

load-module module-loopback latency_msec=1 source=Virtual_Game.monitor sink=YourDeviceName
load-module module-loopback latency_msec=1 source=Virtual_Comms.monitor sink=YourDeviceName
Restart Pulseaudio. It depends on your Distro how to do it best.
On Manjaro KDE you can use systemctl --user restart pulseaudio
Wire up to newly created output devices. See Wiring Output Devices Section above for further info.
Bonus: Pipewire
For pipewire, creating a aforementioned setup is as easy as creating a file under ~/.config/pipewire/pipewire.config.d/10-game-sink.conf
with the following contents:
# ~/.config/pipewire/pipewire.config.d/10-game-sink.conf
context.modules = [
  {   name = libpipewire-module-loopback
    args = {
      audio.position = [ FL FR ]
      capture.props = {
        media.class = Audio/Sink
        node.name = game_sink
        node.description = "game-sink"
      }
      playback.props = {
        node.name = game_source
        node.description = "game_source"
        target.object = "YourDeviceName"
      }
    }
  },
  {   name = libpipewire-module-loopback
    args = {
      audio.position = [ FL FR ]
      capture.props = {
        media.class = Audio/Sink
        node.name = comms_sink
        node.description = "comms-sink"
      }
      playback.props = {
        node.name = comms_source
        node.description = "comms_source"
        target.object = "YourDeviceName"
      }
    }
  }
]
You can find more info on Pipewire’s Virtual Devices Documentation.